Nail trims are the one grooming task that seems to intimidate even confident owners, and for good reason — nobody wants to be the person who makes their dog bleed and then dreads every trim afterward. The good news is that finding the quick reliably, even on black nails, comes down to a specific technique anyone can learn, and a nervous or squirmy Labrador can genuinely be trained to tolerate trims calmly with the right approach.
- Why Nail Length Matters for Joint Health
- Anatomy of the Nail and Finding the Quick
- Tools: Clippers vs. Grinders
- Step-by-Step Trimming Instructions
- Trimming Dark/Black Nails Safely
- What to Do If You Cut the Quick
- Desensitizing a Nervous Labrador
- Trimming Frequency and When to See a Pro
- Frequently Asked Questions
Why Nail Length Matters for Joint Health
Overly long nails don’t just click annoyingly on hardwood floors — they change how a dog’s foot contacts the ground, pushing the toes back and altering natural posture and gait. Over time, this added strain can contribute to discomfort and put extra pressure on joints already carrying real risk in this breed, given Labradors’ predisposition to hip and elbow dysplasia. Keeping nails at a proper length is a small, easy habit with a genuine connection to long-term comfort and mobility.
Anatomy of the Nail and Finding the Quick
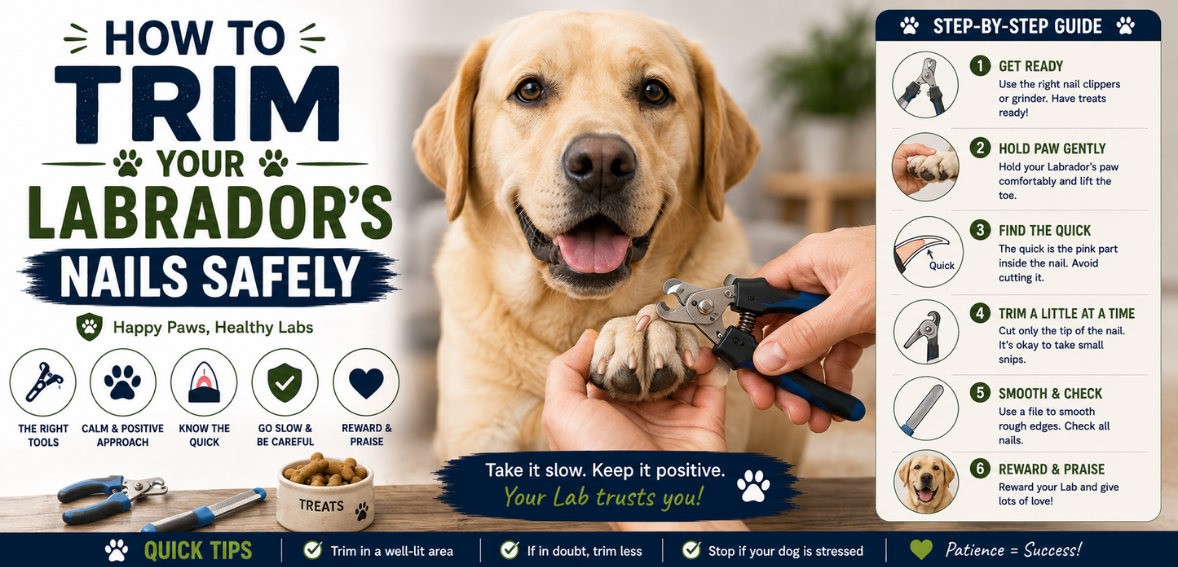
The “quick” is the blood vessel and nerve running through the center of each nail. Cutting into it causes bleeding and real pain, which is exactly why fear of hitting it stops so many owners from trimming confidently. In light or clear nails, the quick is visible as a pinkish area within the nail — trim just before where that pink section begins. In solid black nails, the quick isn’t visible from the outside, which is why the technique below (small, incremental cuts) matters so much more.
Tools: Clippers vs. Grinders
| Tool | Pros | Cons |
|---|---|---|
| Guillotine or scissor-style clippers | Fast, widely available, familiar to most owners | A single decisive cut carries more risk of over-cutting than gradual filing |
| Rotary grinder (e.g., Dremel-style) | Gradual removal reduces sudden over-cutting risk; smooths edges | Noise and vibration can worry some dogs initially; risk of heat/friction if held too long in one spot |
Neither tool is objectively “better” — many groomers use clippers for the initial length reduction, then a grinder to smooth and fine-tune. If your dog is noise-sensitive, introduce a grinder’s sound separately, without touching the nail, well before using it for real.
Step-by-Step Trimming Instructions
- Get your dog settled and calm, ideally after some exercise when they’re naturally more relaxed.
- Hold the paw gently but securely, pressing lightly on the toe pad to extend the nail slightly.
- Identify the quick if visible (light nails), or plan to trim in small increments (dark nails).
- Make a small cut just past the end of the quick, or a small amount off the tip if the quick isn’t visible.
- Check the cut surface after each small trim — a solid white/chalky center means you can safely take a bit more; a grayish or pinkish dot means stop immediately.
- Repeat on each nail, including dewclaws if present, taking breaks if your dog becomes stressed.
- Reward generously throughout and immediately after finishing, regardless of how the session went.
Trimming Dark/Black Nails Safely
With black nails, trim in small slices rather than one confident cut. After each slice, look directly at the newly exposed cut surface. A dry, chalky white oval in the center means you’re still safely clear of the quick. The moment you see a small grayish or pinkish dot appear in that center, stop — you’ve reached the point just before the quick, which is exactly where you want to be.
This takes a bit more time than trimming light nails, but it’s a reliable, low-risk method rather than guessing at a length.
What to Do If You Cut the Quick (Styptic Powder)
- Stay calm — a cut quick bleeds more dramatically than it usually needs medical attention for, but it’s uncomfortable for your dog.
- Apply styptic powder (such as Kwik Stop) directly to the tip of the nail, pressing firmly for 20–30 seconds.
- If you don’t have styptic powder, plain cornstarch or flour pressed firmly onto the nail works as an emergency substitute.
- Keep your dog calm and still for a few minutes afterward, since movement can restart bleeding.
- Contact your vet if bleeding doesn’t stop within several minutes of firm, direct pressure, or if the area looks infected in the following days.
Keep styptic powder in your grooming kit at all times — even experienced groomers occasionally hit the quick, and having it ready removes the panic from an otherwise manageable moment.
Desensitizing a Nervous Labrador
- Practice paw handling separately from actual trims, touching and gently holding paws during calm moments, rewarding the whole time.
- Introduce the clipper or grinder sound alone, without touching the nail, pairing the sound with treats until it stops causing a reaction.
- Touch the tool to the nail without cutting for several sessions, rewarding calm acceptance before ever making an actual cut.
- Trim just one or two nails per session at first for a genuinely nervous dog, building up gradually rather than pushing through all nails in one sitting.
- Never force or restrain harshly through panic — back off and rebuild confidence at an easier step rather than pushing through distress.
My own strong, squirmy Lab needed several weeks of this kind of separated, low-pressure practice before trims became routine — rushing it the first few times only made her more resistant, while slowing down completely turned it around.
Trimming Frequency and When to See a Groomer/Vet
- Trim every 3–4 weeks for most Labradors, or whenever you hear nails clicking on hard floors
- See a professional groomer or vet tech if your dog is too fearful or aggressive for at-home trims to be done safely
- See your vet if a nail appears cracked, split, or infected, rather than attempting to manage it at home
Once nails are handled, see our guides to cleaning your Labrador’s ears and Labrador dental care and teeth cleaning to round out a full at-home grooming routine, alongside our guides to bathing frequency and understanding the double coat.
- Guillotine or scissor-style clippers, sized for a large breed
- Rotary grinder (optional, for smoothing or gradual trims)
- Styptic powder
- High-value treats
- A towel or non-slip mat for stable footing
Frequently Asked Questions
How do I trim my Labrador’s nails without hurting them?
Trim in small increments and check the cut surface after each one — stop the moment you see a grayish or pinkish dot appear in the center, which signals the quick is close. This works for both light and dark nails.
Where is the quick in a dog’s nail?
The quick is the blood vessel and nerve running through the center of the nail. In light-colored nails it’s visible as a pink area; in black nails it isn’t visible externally, which is why incremental trimming is the safer approach.
How short should I cut my Lab’s nails?
Trim just before the quick begins, or in small increments for dark nails until you see a grayish dot appear on the cut surface. A well-trimmed nail typically doesn’t touch the ground when the dog is standing normally.
What do I do if my dog’s nail bleeds?
Apply styptic powder directly to the nail tip with firm pressure for 20-30 seconds; cornstarch or flour works as an emergency substitute. Contact your vet if bleeding doesn’t stop after several minutes of firm pressure.
Should I use clippers or a grinder for my Labrador?
Both work well; many owners and groomers use clippers for the initial length reduction and a grinder to smooth and fine-tune. Choose based on your dog’s tolerance for each tool’s sound and sensation.
Sources
- American Kennel Club — How to Trim Your Dog’s Nails
- VCA Animal Hospitals — Nail Trimming in Dogs